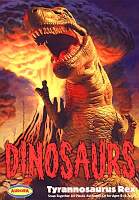
 Alot of Dinosaur related events were going on when this
kit hit the shelves. The Discovery Channel's 'Walking With Dinosaurs' and Disney's CGI film, 'Dinosaurs' made good timing on POLAR
LIGHTS part to come out with three new Dino kits of their own! Alot of Dinosaur related events were going on when this
kit hit the shelves. The Discovery Channel's 'Walking With Dinosaurs' and Disney's CGI film, 'Dinosaurs' made good timing on POLAR
LIGHTS part to come out with three new Dino kits of their own!
Add the use of the original AURORA logo placed on the boxes and these kits should appeal to both young and old alike!!
So let's open the T-Rex box and get started!!
Preliminary Buildup!
First let's talk about the down side of this kit. Then we'll get into the good things!
Ten years must be the limiting factor on Snap Togethers!! If you're older than 10 years old, you're not
qualified to put these things together!!
The only things that went together like they were suppose to, for me, were the individual halves! Anything that
had to be snapped together, like the tail to body, head to body, mouth pieces, I ended up having to cut off the tabs
to get them to go together!!
If you buy this kit as a project to do with your children, make sure you help them over this stage!!!?!
The feet did snap into the legs, as well as the arms to the body...but I want to see someone get that tail and head attached like
it's designed to do!!!!!
Okay...that's the bad stuff! I fell back to good old fashioned liquid glue and a nice sharp pair of snippers and got everything
together the way I liked it!
Like the Lindberg GODZILLA, because of the great skin details on the T-REX, getting rid of the seams is a bear! I first attacked
them using the back side of an X-Acto knife, then tackled them with needle files to put detail back in.
Testor's Contour Putty used to filled gaps around the arms & legs...a nice primer coat will let me know if more sanding is needed!
Painting T-Rex!
Give T-Rex and the Base a nice coat of KRYLON's Sandable Primer. A couple of places require more putty and
sanding, then re-primed.
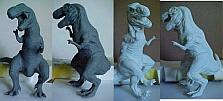 Spray him down with a base coat of KRYLON's Flat White. Spray him down with a base coat of KRYLON's Flat White.
Next, using Delta Ceramcoat Light Chocolate, I paint his body.
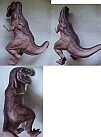 Using Apple Barrel Burnt Umber, I paint a thick stripe down his back bone. Now have some fun with the Burnt Umber by dry-brushing to blend the color down into the Light Chocolate. Start at
his back bone to take the bulk of the paint off your brush, then fan down the sides of his body. Using Apple Barrel Burnt Umber, I paint a thick stripe down his back bone. Now have some fun with the Burnt Umber by dry-brushing to blend the color down into the Light Chocolate. Start at
his back bone to take the bulk of the paint off your brush, then fan down the sides of his body.
Seal using Krylon's Matte Finish.
The inside of his mouth is White, with just a touch of Red added to the mix. Teeth are White, then drybrushed lightly to brown them down a bit.
Eyes are Yellow, with a Red pupil using a Gel pen, then before that dries, use a Black gel pen and tone the red down some.
Painting the Base!
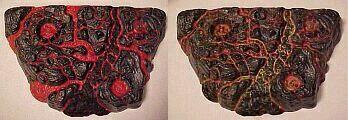
Started by doing an image search on Lava photos, which you can check here.
Used the dark gray color of KRYLON's Sandable Primer as the base coat, drybrush with Black.
 For the Lava Flows, at first I tried using a red
Marvy Gel pen, but as you can see here, it wasn't bright enough. So ended up using Palmer Prism
Holly Berry Red. Satisfied with the brightness there, I painted over the Gel color. For the Lava Flows, at first I tried using a red
Marvy Gel pen, but as you can see here, it wasn't bright enough. So ended up using Palmer Prism
Holly Berry Red. Satisfied with the brightness there, I painted over the Gel color.
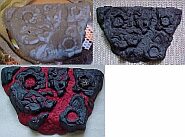
Once that dried, sprayed a nice even layer of KRYLON's Matte Finish. Next we take Palmer Prism's Raven
Black and start to paint a top layer of harden molted rock floating on top of the lava flow.
Once that is dry, seal, then apply a final wash using Palmer Prism Sunlight Yellow. Finish with a final coat of KRYLON's
Matte Finish.
Summary!
Besides the slight difficulty snapping pieces together, I liked this kit alot!
The T-Rex is a nice hefty size to begin with. And if you have a few resin Garage Kits stuffed up
in the closet with a Dinosaur or scaly monster subject matter, this styrene kit is a nice inexpensive
way to practice your painting skills!
I'll admit that I didn't realize that the base was actually molted lava flowing over rocks until I saw the
photo of the finished kit on PL's table at WONDERFEST! Upon first laying eyes on the base I thought
it was pretty ugly! Once I distinguished the lava flows, then I thought it would be great to paint up.
Was quite a challenge making realistic lava!! And enjoyed doing it immensely!
Happy Modeling! - Buc (June - August 00')

Work Bench
T-Rex Photo's
| 


 For the Lava Flows, at first I tried using a red
Marvy Gel pen, but as you can see here, it wasn't bright enough. So ended up using Palmer Prism
Holly Berry Red. Satisfied with the brightness there, I painted over the Gel color.

![]()