GIGANTICS
RAMPAGING SCORPION DIORAMA!

|
Have seen this series advertised alot lately, so don't know if
these were reissued again recently? My box has a copyright of 1996,
but I'm happy to see them out again, whenever they appeared!
Anyone growing up in the late 50's and 60's has fond memories of the
Giant Bug movies that were coming out in our wide screen theatres!!
My favorite remains The Tarantula, which I also have safely tucked
away in my closet, as well as the Giant Praying Mantis.
A harder one to find nowadays is the Giant Wasp. I don't believe
that's been reissued to date. All were initially issued by Fundimensions
back in 1975.
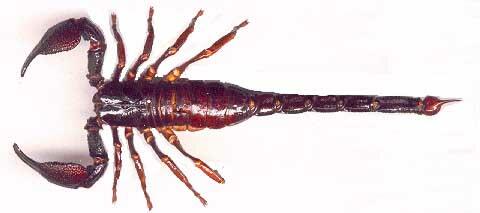
This model is a nice size. The Scorpion itself measures 7" X 3 5/8"
and when placed on the cardboard diorama, measures 9 1/2" X 6" X 6". Not so
big that it's hard to find room on your shelf, but not so small that
you can't have fun painting in details.
After staring at photo's all day, liked the look of this one for his black, red and yellow. As well as that nice shiny look!
 Instead of doing a step-by-step review of this model, I'll just note some of the things I ran across.
Looking as I pull the sprues out, there's ALOT of flash on these parts!! Make sure you have a ready supply of fine grade sandpaper! Especially around the ends of those tiny legs! Section C - E: Have to applaud the designer for that minature mounting table which Scorpy sits on so you can attach his legs. The holes ensure that all 8 legs will be flush to the floor of the base when he's ready to be placed there. Nice job! The problem with taking the time to ensure each piece is nicely sanded and seeing if any putty has to be applied, is that I usually take all the pieces (meaning all 8 legs) off the sprue without noting their numbers! So after the halves were glued together and I laid all the legs down on my workbench, arranged them by size, I at first thought I had mistakenly gotten extra right legs!! Turns out that the front two legs are almost the exact same size and shape. So when you get to glueing the legs on, and you haven't remembered what leg is what part number, the solution is easy: Lay all the legs out on your table by size, and make sure the correct side is facing up. If you notice, one side of the legs have deeper indentations than the other. The deeper side goes down. Then starting on the right side of his body (right meaning, his right...looking from the tail to the head...your left if you're looking at his head) ...pick up the bigger two legs and test fit them both in the two back slots, seeing how well they; 1) fit in the hole on the mounting table, and 2) fit in the hole in his body. Do the same for the front two legs. Once you figure out what leg goes best in each hole, glue away. Do the same for the left side. You'll discover right off that the plastic to plastic ratio between leg and body hole doesn't have that much for the glue to adhere to. Once ALL eight legs were in place and had sat for awhile, I picked Scorpy up off the mounting table and applied extra glue from underneath the body, thus strengthing the bond. Don't forget, Scorpy has to stand on his own in the end. Glued the two front claw halves together and let dry. The idea of the two pegs on the mounting table to hold up the left claw is great! Again, after your initial glue sets, test the strength of the claws.
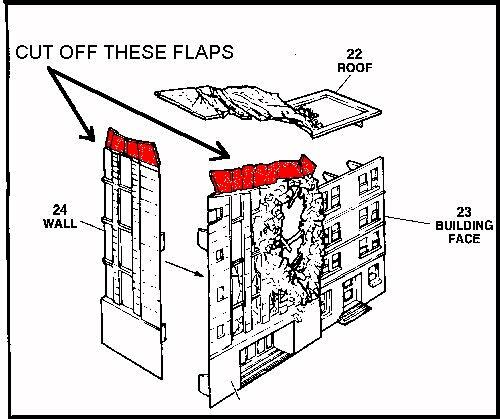
Step 3: #23 & #24 go together nicely. Not sure what the designers where thinking with that roof, though? Just what are those 'flappy' things on top of the building suppose to be? And what does one do with all those gaps between the roof & wall?! Fitting the roof so that if rests on the two tabs on #23, as well as aligning with the side of the building (#24) resulted in the roof slightly above the small tab on #24. Also the ridges that go up against #24 didn't align. I wonder if those 'flaps' on the wall aren't suppose to be there? If you look at the pattern of the inside of the roof, looks like it matches the tops of the brick portions of #23. And the flat piece of the roof does have a lip which appears could snug up to the building... except those flaps are holding the roof back?! Ahh, what the heck...model only costs $3.95! Pull the roof off and put aside. Taking my trusty crimps, I clip off the flaps (See photo), sand down the rough edges, then test fit roof. Not perfect, but much better than previously! Glue the roof on, aligning the flat portion first. Once that's dry, bend down the end flap to the side wall (#24) and glue it down, as well as those portions touching #23. Let sit and dry. You'll still have a few gaps to putty, but alot less this way! And frankly, the building itself looks better without those flaps. Using TESTOR's Contour Putty, I applied the putty from the inside and built it up. That way I didn't have to worry about getting to much on the front of the building. The portions that did squeeze out the front are wiped away with a kleenex, leaving a smooth edge. Second Building: went together easily. Glued #26 to #28 and once dry, placed the roof on the workbench, put glue on the edges and then fit the 'L' shaped building down onto the roof. Once that was dry, glued #27 to the other end. People: Figure wise you'll notice that you have an awful lot of them. A few are repeated. I'll probably only have a few on the base, running around, so for now I clean up 5 of them. Did notice there were two of the running girl figure! So I took one, and using a lighter, I heated up one of my metal files and slowly moved her arm up so that both arms are above her head. Then I clipped off the base, and slowly moved her left leg back, bending at the knee (just under her dress). This poor damsel's going into Scorpy's left claw, with the car going in his right!!
Primed the two buildings and let dry. The tiny windows can give you grief, especially the window frames on the small building. I tried using my awl, as well as a 000 brush, but the paint had a mind of its own and did not want to go where I was willing it! There's a couple of ways of doing this. Say you want the frames on the small building, white... I'd first base coat the building with primer, then spray on a coat of white over the entire building. That way you can go back and paint in the window panes a blue, and the bricks red, being careful not to touch the white frames. The one problem here is that the red you use for the bricks allows the white base coat to shine through..so you'd have to lay down two, maybe three coats of the red before you're satisfied. You can do what I ended up doing... save the frames for last. Paint the panes a blue, bricks red, then search around your art and model supplies for some colored magic markers, fine tip pens or Paint Markers. I had a nice fine point Black marker that was perfect for the window frames. Used standard old magic markers with slightly thicker ends, but still pointed enough to use on doors & frames (various brown markers), and window panes (light sky blue markers). Went out and picked up a white Paint Marker, and although I had already done the window frames on the brick portion of the large building, will be a handy tool in future kits. (Thanks to all my Gremlin buddies for suggestions to this dilemma!!) Recheck the colors after you put on your final Dullcoat. The browns turned light purple on my door frames, but just went over them again once the Dullcoat had dried and they were fine.
Bend the edges over. I used simple scotch tape since I wasn't sure if using modeling glue would bubble the cardboard. Put the decals on the small building, place Scorpy with his tail up against the bashed in building and the figures & cars where you like and we're done! The finished Scorpion model are here! Happy Modeling! - Buc
|