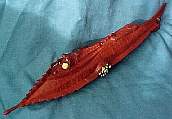
Picked up the NAUTILUS kit at the Oct. 2000 CHILLER THEATRE Expo.
Measuring 16" long, there's alot of nice detail to this kit and it was the perfect length. Not to big so you have problems finding a place on your shelf, but not to small you lose details.


First thing I had to do was make a stand so I could lay it down between coats of paint. Looking over my large stash of styrofoam pieces, removed one that was pretty much rectangluar. Cut a nice ridge out of the middle for the hull to rest on.
Checked out the kit pretty closely, looking for any areas that needed sanding. Had to glue a small section of the teeth near the bottom front of the hull where it had cracked during handling.
Once I was satisfied, I sprayed a nice even coat of KRYLON's Rusty Brown Sandable Primer & let dry.


 Start off using Apple Barrel's Burnt Umber and dry-brush the entire ship.
For the side windows I used Anita's Buff/Chamois White as a base coat. Sprayed a layer of Krylon's Matte
Finish, then mixed a few drops of Sunlight Yellow into some Future Floor Wax and went over them lightly.

 Touch
of Green covered with Future for the top two forward 'eyes'.
 This kit was missing the single screw and the screw guard.
My buddy, Richard, down at my local hobby shop carried 'Model Shipways Quality Fittings' and in one of the packages was a 3 blade metal screw, 30mm (part # MS2864) which was perfect!!
I'll think up something for the screw guard. Maybe thin sprues and a
water bottle cap cut to size?
I have to make up a nice stand. Haven't figured out what to use yet to hold the model up, but I'm sure I'll come up with something!!
Other than that, this was a nice easy kit to do. No parts to glue together, just prime and start painting!! Always nice to have one of these come along!

|

|

|
 |
Happy Modeling! - Buc (Dec. 00')
Work Bench