 It
was a week til CHILLER. and I was waiting for another kit to dry, so decided
to break open the seal on the REVELL/CINEMODELS/POLAR LIGHTS, TRU re-issue
of the first AURORA model I ever put together! It
was a week til CHILLER. and I was waiting for another kit to dry, so decided
to break open the seal on the REVELL/CINEMODELS/POLAR LIGHTS, TRU re-issue
of the first AURORA model I ever put together!
So let's open it up and get to it...
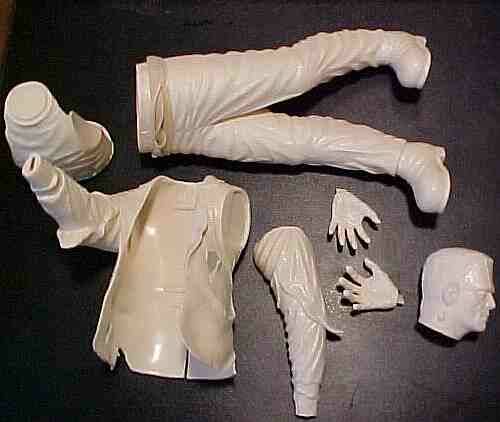
Take all the sprues out and gently clip everything off. I like the
way the jacket rips are actual cuts in the jacket sides and not just
indicated by indentations in the casting!
Alot of flash, but easily removed with an Xacto #11 Blade.
 Right
now I have the chest piece glued to the 'hip body plate'...the arms
together, the right & left legs halves together, the jacket and the
head. Right
now I have the chest piece glued to the 'hip body plate'...the arms
together, the right & left legs halves together, the jacket and the
head.
Most of the sanding along seams are done. Glue the arms on and then
start checking for areas that need putty & more sanding.
There's something with this thicker styrene that makes sanding down
seams alot easier. Concern here is with the grainy texture of Frankie's
pants that are sanded smooth during this process.
Someone recommended taking a wire brush, dipping it in liquid glue
and using the hard bristles to replace the grainy surface. Went to my
tool box and found my steel brush. Applied liguid glue about an inch
down the leg seam, and with a dabbing, scratching motion, went at it.
If you let the glue sit for about half a minute, then start scrubbing
and dabbing, works like a champ! Finished the outside seam on both legs
and set aside! Another great tip from the Gang!
Glue the jacket to the body. Found after you initially glue it on,
while you're holding it to set up, take the brush and apply liquid glue
down along the open coat flaps and his chest, turn him over and move
some glue up inside the back of his jacket up towards his lower back,
and anywhere else you can think of to get the brush up into.
You can never have enough glue hold!
Let dry, then prime the monster with KRYLON's!
Painting Frankie
His head and hands are still unattached to the body. Start out with
a mix of ANITA's Fathom Green, some Yellow and a touch of White. (I'm
from the OLD school...Frankie's green and that's all there is to it!!)
Once dry and clear coated, mix up Leaf Green with a bunch of Yellow
(more Yellow than Green), and dry brush it on. Now to get progressively
more pale-ness on the next pass.
I continue on after his body is painted, since there's his wrist and
part of his stomach showing through his shirt that had to be done as
well & I didn't want to have to try to re-match the color later.
I take ANITA's Fathom Green again, and lighten it with Sand and White
until I get the color I like. Then I dry brush it on the face and hands.
Then using dark gray makeup, I brush it on blending everything together.

Then finish it off by painting the neck bolts and staples a nice silver,
take a fine point Gel Pen and line in the scars and we're done!

Paint the wrist portions at the end of his arms, and those sections
of his stomach showing through his jersey.
Start off with APPLE BARREL Burnt Umber for the jacket, Black for
his pants, and ANITA's Ocean Blue for his jersey and sleeves. Mix up
a light khaki brown using Burnt Umber, Yellow and Sand for his boots.

Now to tone down the Ocean Blue by dry-brushing on Sand. Once dry, I
again use a light gray makeup powder and blend everything together.
I want a sweatshirt type look to this.

Finish off with some Burnt Umber and drybrush the creases on his boots.
Glue on the head and hands, do some touch ups and the body's done!
Not sure if I agree with my Modeling Buddies and put Frankie all together
right at the get-go! Think you'd find it easier to have painted the
jacket and jersey if the jacket was not attached yet. It's not impossible
to get up under the jacket areas where they cover the jersey and the
top of the paints, but it definately wouldn't be a problem if you left
the jacket off til the end.
The BASE
First I mask off those portions of the base where his foot goes, &
the gravestone area and then hit the base with a nice coat of KRYLON's
Sandable Primer and let dry.
  A
new AC Moore opened up w/in a few miles of the house and while spending
a fortune on more crap for this hobby, came across this. Squeeze
& Flo Brush Set. Comes with 6 different brushes that you just screw
on to your 2 oz. Acyrlic paint bottles and paint away! A
new AC Moore opened up w/in a few miles of the house and while spending
a fortune on more crap for this hobby, came across this. Squeeze
& Flo Brush Set. Comes with 6 different brushes that you just screw
on to your 2 oz. Acyrlic paint bottles and paint away!
Tried it out on the base. Took a bottle of ANITA's Fathom Green for
a base coat, took a brush and tried to screw it onto the top of the
2 oz. bottle. Yellow cap was too small, but discovered you can remove
the yellow portion to get to a wider screw top.
Screwed it on and turned it over. Squeezed the bottle..but no paint
was getting down to the brush. Tried several times, even taking it to
the sink, washing it out and trying it again. Either ANITA's acyrlic
is too thick or these are a waste of money.
(Later I tried these out with APPLE BARREL acyrlics and the results
were the same. Nice idea, but don't waste your money on this particular
version!)
In the end just painted the base with a simple wide brush. Once dry,
spray it with a clear coat.
Then I take my palette with the 8 small cups around the edge and place
some Fathom Green in one, Yellow, White, Burnt Umber, Sand and Black
in each of the others. Then just start drybrushing on different grassy
colors til you're happy with the overall effect!

For the gravestones, primed with KRYLON's Dark Gray Sandable Primer,
then cover with clear coat. Mix up a very light, almost whitish gray
and lightly brush it over the stones. Would have been great to have
had a rougher surface on the gravestones.
Not totally satisfied with the look yet, I discover the wife has some
makeup of light gray and light black... (I didn't ask me what she uses
these colors for). Taking some makeup brushes, I go at it with various
shades. Then Dullcoat to see if there's any fading of the colors.

It actually looks better than the camera picked up! Remove the masking
tape on the base and glue down the gravestones. Drybrush the two foot
stones with sand and glue them on as well...using Testor's Contour Putty
to fill up the gaps since the holes on the base are much larger.
After Thoughts!
A fun model to put together! Overall piece fit was very good, seams
were a snap to sand away and the painting portion was a blast!!
It was great to do this particular model once again, since the last
time I put him together was 40 years ago! My thanks to all the companies
that made the re-issue possible!!
Happy Modeling! - Buc (Apr/May 00')
Work Bench FRANKENSTEIN
Photo's
|


 Right
now I have the chest piece glued to the 'hip body plate'...the arms
together, the right & left legs halves together, the jacket and the
head.
Right
now I have the chest piece glued to the 'hip body plate'...the arms
together, the right & left legs halves together, the jacket and the
head.


