|
PRELIMINARY STEPS
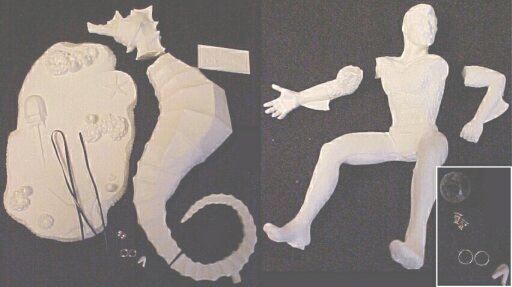
The AQUAMAN kit comes in fifteen pieces, overall. In a large plastic bag you'll find the figure of Aquaman himself, sans arms, the base, and the main body of the Seahorse.
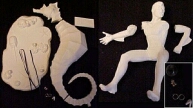 In a small plastic bag you'll find five smaller pieces which include the Seahorse head, his tail, Aquaman's two arms and a small inverted 'V' for his belt. In a small plastic bag you'll find five smaller pieces which include the Seahorse head, his tail, Aquaman's two arms and a small inverted 'V' for his belt.
Another small bag includes the nameplate, a thin long piece of Black plastic for the reins, a small crystal ball, 2 small rings and 2 earring studs.
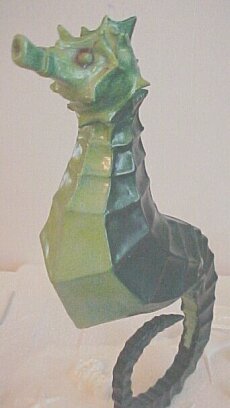
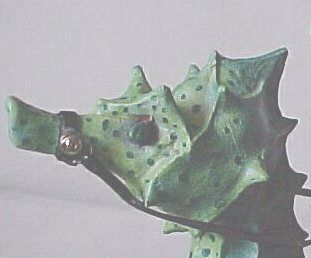
The detail is rather soft on both Aquaman's facial features and the seahorse himself. Would have loved more skin texture on the Seahorse for the opportunity to dry-brush different paint schemes, but overall this kit does reflect a 60's style Aurora model in it's simplicity.
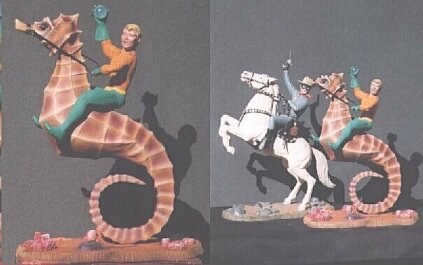
 There were neither instructions nor photo's that came with my kit, so I simply e-mailed Al and he passed me a color photograph of the completed piece. The overall size of this kit is equal to the Aurora 'Lone Ranger' model in height and base width. There were neither instructions nor photo's that came with my kit, so I simply e-mailed Al and he passed me a color photograph of the completed piece. The overall size of this kit is equal to the Aurora 'Lone Ranger' model in height and base width.
The only resin kit I've done to date has been 'Shape of Things' Jonny Quest BANDIT, which was just a one-piece kit. This will be my first kit where parts have to go together, so if I can do this, then you certainly can!
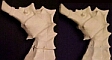
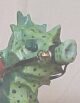
First thing I do is test fit the pieces to see how much sanding is needed, and more especially, where it's needed. The Seahorses' head to body will need some sanding and putty work, and the tail to body looks like a pretty good match, so won't need much there.
Aquaman's arms fit in pretty nicely, but his shirt is made up of small circled scales, so any putty applied there you'll have to replace the details.
GETTING STARTED
I go outside with my exacto knife and a set of needle files, and start sanding down the seam lines on the various parts.
Using my trusty Dremel Tool and the 1/2" dia. Drum Sander attachment, sand down the flat areas where parts join, and some slight dips and bumps on the seahorse between the ridges.
Make sure you do all your sanding in a well ventilated area. Resin dust is NOT good for the old lungs!!
Test fit the various pieces often as you sand the flat areas where another piece joins. It's harder to replace resin if you take off too much, than it is if you've taken off too little!
Once you've completed most of the sanding, wash all the resin pieces in warm, dish detergent soapy water, with the aid of an old toothbrush, making sure you remove any mold release still on the kit.
I leave the pieces lying out to dry overnight.
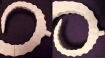
PINNING THE SEAHORSE
Taking a black fine point marker in hand, I make four tick marks on each side of the pieces, separate them and then connect the lines to mark off where the center of each piece is.
  I use a thumbtack to make a starter hole in the exact center of the piece and taking my trusty Dremel tool and a 1/8th inch drill bit, drill a hole down about 1/4" deep on the head, and the same depth on the body. I used a large 'butterfly' type paper clip, straighten it out and with wire cutters, cut off a piece, and insert into the hole on the head and see how it fits into the body. I use a thumbtack to make a starter hole in the exact center of the piece and taking my trusty Dremel tool and a 1/8th inch drill bit, drill a hole down about 1/4" deep on the head, and the same depth on the body. I used a large 'butterfly' type paper clip, straighten it out and with wire cutters, cut off a piece, and insert into the hole on the head and see how it fits into the body.
Put the head aside, and do the same thing for the tail pieces, again marking off an 'X' on both pieces, finding the center and drilling the holes. Again test fit the two and make sure everything lines up correctly!
 Using Zap-A-Gap CA glue, I glue the pin into the head piece, put two drops down the hole in the body and some around the flat surface and glue the head on. After that dries for a spell, do the same with the tail piece and the seahorse is together! Using Zap-A-Gap CA glue, I glue the pin into the head piece, put two drops down the hole in the body and some around the flat surface and glue the head on. After that dries for a spell, do the same with the tail piece and the seahorse is together!
 By the way, I did NOT remove the mold post from the small tail piece. This portion of the tail has to sit on the base, so will be drilling a corresponding hole into the base so that the Seahorse is anchored securely with the aid of that post. By the way, I did NOT remove the mold post from the small tail piece. This portion of the tail has to sit on the base, so will be drilling a corresponding hole into the base so that the Seahorse is anchored securely with the aid of that post.
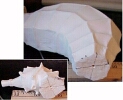
Set everything aside over night to dry. Next day I use Milliput putty, and fill in the gaps. I let that sit for 2 days, then sanded it down with fine grit sandpaper.
Did not pin Aquaman's arms. Found that using CA glue alone was strength enough. Once the shoulder seams were puttied, I used the end of a mechanical pencil to restore the scale effects.
Sitting Aquaman on the seahorse, mark the spot on the seahorse that corresponds to the hole already present on the bottom of Aquaman. To get a true marking, clipped off a short portion of the paperclip, just enough so that a small portion of the pin appears out from Aquaman and produces a scratch mark on the seahorse. Then drill and test fit to make sure everything lines up.
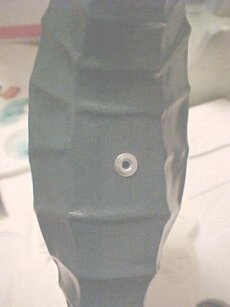
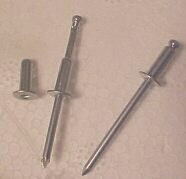  I wanted extra strength where Aquaman sits on the Seahorse, so taking a simple rivet, I slide the riveting piece off from the nail portion. Drilled the hole on the Seahorse's back the width of the rivet and test fitted. Now the pin that is glued to the bottom of Aquaman simply slides into the hole on the rivet head and once superglued, should provide a nice strong hold! I wanted extra strength where Aquaman sits on the Seahorse, so taking a simple rivet, I slide the riveting piece off from the nail portion. Drilled the hole on the Seahorse's back the width of the rivet and test fitted. Now the pin that is glued to the bottom of Aquaman simply slides into the hole on the rivet head and once superglued, should provide a nice strong hold!
Last thing to do is place the seahorse down on the base where you want him, and using a pencil, trace around the mold post. Remove the seahorse and taking the Dremel, drill a hole through the base. Again, test fit to make sure everything's okay.
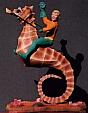
Preliminary work is done! Now we get to the best part of model building...the paint job!!
PAINTING AQUAMAN
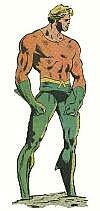
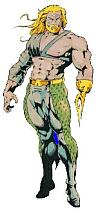
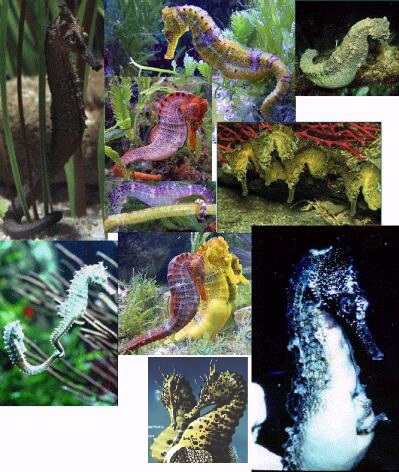
First thing I do is go up on the Internet and find some reference photos of both Aquaman and seahorses.
Using KRYLON's Ruddy Brown Sandable Primer, give both figures and the base a nice even coat.
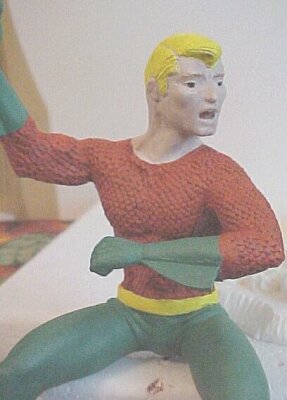
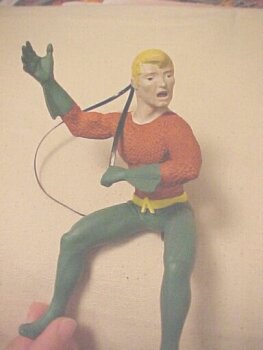
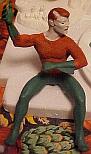 Aquaman's colors are pretty basic. For his shirt I used Anita's acrylic Carrot Orange and a 1/2" bristle brush. Although I loaded the brush up with paint, I used a dry-brushing motion across his shirt that enabled the orange paint to nicely lay on top, leaving the Ruddy Brown still showing on the edges of each scale. This gave the shirt a chainmail-like appearance. Aquaman's colors are pretty basic. For his shirt I used Anita's acrylic Carrot Orange and a 1/2" bristle brush. Although I loaded the brush up with paint, I used a dry-brushing motion across his shirt that enabled the orange paint to nicely lay on top, leaving the Ruddy Brown still showing on the edges of each scale. This gave the shirt a chainmail-like appearance.
For pants and gloves I used Palmer Prism's Leaf Green, belt and hair Yellow. Apply a light wash of Chocolate Brown to tone down the Yellow in the hair.
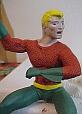 For the face and neck I mixed up Light Chocolate Brown with White for a base coat. At this stage I sealed Aquaman using Testor's Dullcoat. For the face and neck I mixed up Light Chocolate Brown with White for a base coat. At this stage I sealed Aquaman using Testor's Dullcoat.
Using the wife's makeup, I brush on a slightly darker flesh pigment to the face and neck, let sit for a day, Dullcoat, then apply another layer. Using a dark brown Prismacolor pencil I line in his eyebrows.
PAINTING the SEAHORSE
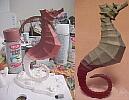 I initially planned on a Brown variation for the seahorse, but the more I looked at it the less happy I was. It was just too average! So I looked at my spray can shelf and pulled down Fashion Satin's Green Sage that I bought previously at Wal-Mart. It's a very light Pea Green color, and laid that down as a base coat. I initially planned on a Brown variation for the seahorse, but the more I looked at it the less happy I was. It was just too average! So I looked at my spray can shelf and pulled down Fashion Satin's Green Sage that I bought previously at Wal-Mart. It's a very light Pea Green color, and laid that down as a base coat.
 Found a wide variety of seahorse photos via the Internet and kept those that showed color variations melding into each other where it was dark down their spine, tapering off to a light color on it's belly area. Found a wide variety of seahorse photos via the Internet and kept those that showed color variations melding into each other where it was dark down their spine, tapering off to a light color on it's belly area.
I used KRYLON's Hunter Green Satin and sprayed down his spine and slightly down his sides, leaving the belly area Pea Green.
 Using an old, empty Testor's Liquid Glue bottle, nicely washed out, I fill it halfway with FUTURE Floor Finish and add about 4 drops of Palmer Prism Sunlight Yellow and stir it up thoroughly. This gives me a nice (and cheap) transparent paint that I brush on over the belly and head areas. Let dry and then apply two more coats. Using an old, empty Testor's Liquid Glue bottle, nicely washed out, I fill it halfway with FUTURE Floor Finish and add about 4 drops of Palmer Prism Sunlight Yellow and stir it up thoroughly. This gives me a nice (and cheap) transparent paint that I brush on over the belly and head areas. Let dry and then apply two more coats.
If I found areas that were too yellow, simply dipped my brush into plain FUTURE and went over it to dull it down some.
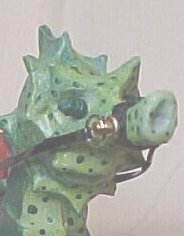
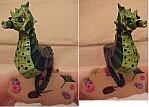 In one of the photos I located on the 'Net, it showed a seahorse with a dot pattern on his belly and face, so using that as a guide, duplicated the effect. Once dry, brush on one more layer of the Yellow Future. In one of the photos I located on the 'Net, it showed a seahorse with a dot pattern on his belly and face, so using that as a guide, duplicated the effect. Once dry, brush on one more layer of the Yellow Future.
Paint the noose around his nose, Black, and then hit the whole thing with Testor's Dullcoat to get rid of the shine.
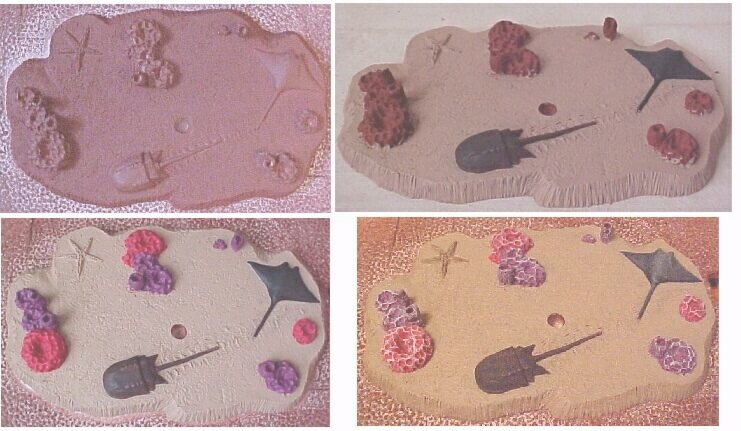
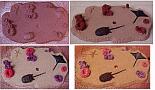
PAINTING the BASE
Primed the base with KRYLON's Ruddy Brown Primer. Once dry, I used Palmer Prism's Raven Black and dry-brushed the Horseshoe Crab, darkening him up some.
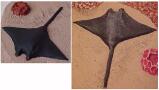
Initial coat of Raven Black for the Skate, drybrush lightly with White, then paint the entire base with Chocolate Brown. Dullcoat, then start on the reefs.
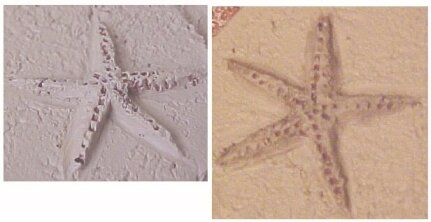
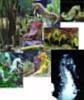
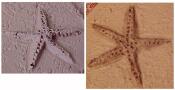
Again using reference photos from the Internet on ocean reefs, used red and purple, drybrushing with White. A wash of Burnt Sienna over the Starfish finishes it off. Last thing I do is to paint the Horseshoe crab with a coat of Future to give it that hard shell shine.
PUTTING IT ALL TOGETHER
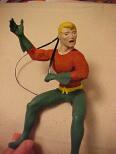 Take out the black plastic rein, fold it in half and cut into two pieces. Superglue one strand on one side of Aquaman's hand, repeat on the other side of his hand and let hang for now. Glue the crystal ball to his right hand. Take out the black plastic rein, fold it in half and cut into two pieces. Superglue one strand on one side of Aquaman's hand, repeat on the other side of his hand and let hang for now. Glue the crystal ball to his right hand.
 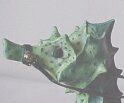 Glue the earring studs on either side of the Seahorse's nose, glue the rivet head into the hole on his back. Glue Aquaman securely onto the Seahorse. Place the seahorse onto the base. Glue the earring studs on either side of the Seahorse's nose, glue the rivet head into the hole on his back. Glue Aquaman securely onto the Seahorse. Place the seahorse onto the base.
Measure where the reins come to the earring studs, loop the ends through the two rings, glue down the plastic onto itself and cut off the excess plastic. The rings simply loop over the two earring studs.
SUMMARY
Having up to this point been exclusively a Styrene kit builder, this baptism into a multi-part resin kit was enjoyable. Looking back on the experience, except for the pinning, there really isn't that much different between the two mediums. I'd recommend this kit to all beginning resin builders highly!
I'd like to thank Al Rebioro of PYTHON PRESS for producing this fine kit and the chance to add this aquatic hero of our youth to my model collection!
Happy Modeling! - Buc (Nov - Dec 00')

|